Tuesday, December 23, 2008

Merry Christmas From Vaclav's Hovel


Various images from our Xmas jaunt in Manhattan, December 23rd.

1- Saks Fifth Ave window display of "A Flake Like Mike"
2-Rockefeller Center
3-Angel at Rockefeller Center with Saks light show in the background
4-Finn with the Macy's Santa, the best there is.
5-Light Show, Grand Central Station

Friday, December 12, 2008

Stair Report: DONE at 7pm

Progress:

First sheet of wallboard goes up.


Retreading.
Stairs done.
The view underneath.
Cellar door back on hinges.

I love my pneumatic nailer.

So - why did I do it? It wasn't to make it look prettier. I had to put wall board on that outside wall and this was the only real way to do it. I can't refinish the stairs because many of the treads and risers are split, cracked, bowed, or just have too many damn framing nail holes in them (yeah, some bob goddard put them in place with 16d framing nails and they were a BITCH to pull out).

The stringers are not in great shape, either. At some point we'll have to straighten out that section of the kitchen floor near the stairwell (more about THAT later) and then we'll shore up that wall and put completely new stringers, treads and risers in.

But this was a hell of a lotta fun. I can't wait to hear Lola repeat all the obnoxious shit I said today.

Stair Report 1: Noon

Just about ready for sheet rock.
This is before removing the treads and risers, looking under the stairs.
My notes.
Removing treads and risers.
All gone.

Set aside and numbered.

Thursday, December 11, 2008

Moving A Stringer

Last year when we tore out the walls we had to furr them out to make the depth of the walls equivalent to 2x6 walls, for insulation. That meant that we intruded on the stairs a bit. We had the space to put the furring in, but not enough to return the trim piece and put in sheet rock. That means we have to move the stringer on the outside wall of the house in a little, then cut each tread and riser down to allow the sheetrock to go up, and replace the trim (you can see the trim resting against the stairs right now on the right).
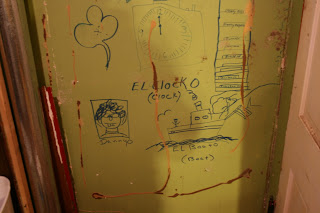
Here is the outside wall underneat the top of the stairs. I've just torn the red paneling off to see the artwork that previous denizens left for me.
With the plaster wall removed, you can see the top of the outside stringer here.
I also sprayed the inside of the wall with bleach to kill whatever's there and keep the dust down.

A close-up shot of the cave paintings.

Tomorrow I'm going to unhinge the door to the cellar, take off each tread and riser, move the stringer, furr, insulate and sheetrock the wall, then replace the stringer, cut the treads and risers, and replace them all.

I have to do this before Cara gets home from school and Jennifer returns from L.A.

More later.

Tuesday, December 9, 2008

A Few Of Our Favorite Things

That's the lid from the "Frog Tape" package, in the center. The plastic container it comes in is a bit much, but I gather it keeps it from drying out.

I don't remember who makes the roller and the edger but they are typical. What we like about them is how nicely the both clean up - and of course how the edger applies the paint so nicely.

The paint brush is a Purdy's, and that specific size is very nice for detail and touch-up work.

What We're After


We were fortunate that the green paint did not require more than two coats to look solid. The yellow needed three or four coats. The section of the wall picture is finished, there are a few other spots left to go but we should be done soon.

The masking tape we used, which is green, is meant specially for masking and boasts not to peel the paint or let bleeding. It's called "Frog Tape". I think it works better than the 3M blue masking tape and we're sticking with it.

Some lessons learned here: we don't like semigloss paint. We really hate it. But it's good for rooms in which you fear there are going to be messes. Our problem is in the way it works when we spread it, and how it shows all the details and mistakes underneath, whereas flat paints don't. Also, the specific base we used seems to be more plastic - you can actually peel off layers of the stuff like there are thin sheets of the latex everywhere (ok, I know, that's what latex paint is, but this does not seem very durable).

We also learned that we need to TELL EACH OTHER that we don't like it. We both assumed the other wanted to continue using it where we did not.

I really like the mini roller and the paint edger we bought. We also got a fantastic paint brush for touch-up and detail. I should get a picture of that and post it. Jennifer used the Wagner power roller to do the blue on the bottom for most of the room. I used a regular roller to do the red throughout, and some of the blue on the remainder of the room. I don't like the bulk of the Wagner, dealing with the cord, and cleaning it afterward is a pain in the ass. Jennifer loves it, though.

I worry that the paint will continue to peel in large sheets. Does this stuff every cure to the point where it won't peel so easily? Is there something clearn that I can put over it, at least where the "seams" are, that will prevent that from happening?

Oh yeah - Finn's Room


Tuesday, December 2, 2008

A Belated Happy Evacuation Day

(original photo found here: http://www.flickr.com/photos/kevin4/3060505546/in/pool-longexposure)

This year on 11/25 it was the 225th anniversary of Evacuation Day, the day when the Redcoats departed Manhattan for good. There was a parade in Manhattan the weekend before, and on this night, as we got home, we could see lights atop Mt. Beacon, which was named for the purpose it served during the War for Independence - as a site for beacon fires that warned of the movement of British troops.

Kind of fitting. We'll be celebrating the evacuation of something else on 1/20.